Hv769Eg~~_3.JPG)
Wednesday 22 December 2010
Thursday 16 December 2010

Monday 29 November 2010


Sunday 28 November 2010


Tuesday 23 November 2010

JAMES FINN and heyde


 We offer new Heyde Replacement Parts, reproductions from original Heyde figures. The Heyde Replacement Parts (HRP) are for Size 2 figures, unless noted otherwise. The Grobe 2 / Size 2 figures represent the most popular scale size, which measures approximately 48mm for Infantry and 58mm for Cavalry figures. Some parts may also be suitable for smaller or larger figures. (minimum order of $5.00)
Prices for 2005, add +20% to item price.
click for picture
HPR page 1: Flags, Lance, Drums, Backpacks, Ammo pouch, Guns, Sword HRP-1, Large Prussian Flag, $2.50 HRP-6, Backpack, $0.60
HRP-2, Lance w/ flag, $1.00 HRP-7, Nap. eagle pouch, $0.25
HRP-3, Infantry flag, $1.50 HRP-8, Basic pouch, $0.25
HRP-4, Small drum, $0.60 HRP-9, Sword, $0.50
HRP-5, Large drum, $1.00 HRP-10 through 14:, Guns, $0.50
click for picture HPR page 2: Heads - 1700's, 1800's, 1900's
HRP-15, Fre. service cap, $0.60 HRP-28, Fre. WWI, $0.60
HRP-16, Shako, $0.60 HRP-29, Kepi, $0.60
HRP-17, Fre. Grenadier, $0.60 HRP-30, Pith helmet, $0.60
HRP-18, Scottish Grenadier, $0.60 HRP-31, Officer cap, $0.60
HRP-19, Tricorn, $0.60 HRP-32, Air service cap, $0.60
HRP-20, Germ. WWII, $0.60 HRP-33, Bersaglieri, $0.60
HRP-21, Hussar, $0.60 HRP-34, Italian cap, $0.60
HRP-22, Jager, $0.60 HRP-35, Turban w/ peak, $0.60
HRP-23, Spiked helmet, $0.60 HRP-36, Indian turban, $0.60
HRP-24, Sailor cap, $0.60 HRP-37, Moroccan, $0.60
HRP-25, Spiked plume, $0.60 HRP-38, Turkish, $0.60
HRP-26, Jager plume, $0.60 HRP-39, Egyptian, $0.60
HRP-27, GI helmet, $0.60 HRP-40, Arab turban, $0.60
click for picture
HPR page 3: Shields, Backpacks, and Horse reins
HRP-41, Round shield, $0.75 HRP-49, Pack w/ round kit, $0.60
HRP-42, Native shield, $0.75 HRP-50, Pack w/ meal kit, $0.60
HRP-43, Rnd. pointed shield, $0.75 HRP-51, Small lion shield, $0.50
HRP-44, Roman shield, $0.75 HRP-52, Large lion shield, $0.75
HRP-45, Crusader shield, $0.75 HRP-53, Small reins, $0.30
HRP-46, Eagle shield, $0.75 HRP-54 Large reins, $0.40
HRP-47, Cross shield, $0.75 HRP-55, Pack w/square kit, $0.50
HRP-48, Eagle shield, $0.75 HRP-56, Backpack, $0.50
click for picture
HPR page 4: Bucket, Flag, Skies, Bow, Pouches, Plume, and others
HRP-57, Bucket, $0.50 HRP-65, Holstier, $0.35
HRP-58, Cannon sponge, $0.75 HRP-66, Shovel, $0.35
HRP-59, Inf. ski, $0.50 HRP-67, Small ammo pouch, $0.35
HRP-60, Flag resting, $1.25 HRP-68, Large ammo pouch, $0.45
HRP-61, Bow, $0.60 HRP-69, Plume, $0.30
HRP-62, Arrows, $0.30 HRP-70, Small pouch, $0.25
HRP-63, Double Axe , $0.50 HRP-71, Germ. grenade, $0.30
HRP-64, Spear, $0.80
Monday 22 November 2010
sepoys 2

The Second Anglo-Sikh War took place in 1848 and 1849, between the Sikh Empire and the British East India Company. It resulted in the subjugation of the Sikh Empire, and the annexation of the Punjab and what subsequently became the North-West Frontier Province by the East India Company.

The Sikh kingdom of the Punjab was consolidated and expanded by Maharaja Ranjit Singh during the early years of the nineteenth century. During the same period, the British East India Company's territories had been expanded until they were adjacent to the Punjab. Ranjit Singh maintained an uneasy alliance with the East India Company, while increasing the military strength of the Khalsa (the Sikh Army, which also saw itself as the embodiment of the state and religion), to deter British aggression against his state and to expand Sikh territory to the north and north west, capturing territory from Afghanistan and Kashmir.
When Ranjit Singh died in 1839, the Sikh Empire began to fall into disorder. There was a succession of short-lived rulers at the central Durbar (court), and increasing tension between the Khalsa and the Durbar. The East India Company began to build up its military strength on the borders of the Punjab. Eventually, the increasing tension goaded the Khalsa to invade British territory, under weak and possibly treacherous leaders. The hard-fought First Anglo-Sikh War ended in defeat for the Khalsa.
 the khalsa
Aftermath of the First Anglo-Sikh War
At the end of the war, the Sikh Empire was forced to cede some valuable territory (the Jullundur Doab) to the East India Company, and Maharaja Gulab Singh, the ruler of Jammu, was allowed to acquire Kashmir from the Sikh Empire by a large cash payment to the East India Company. Some of the Khalsa were forced to make an expedition to oust the ruling Maharajah of Kashmir in favour of Gulab Singh.

The infant Maharaja Duleep Singh of the Sikh Empire was allowed to retain his throne, but a British Resident, Sir Henry Lawrence, controlled the policy of the Durbar. Duleep Singh's mother, Maharani Jind Kaur, continually tried to regain some of her former influence as Regent and was eventually exiled by Lawrence. While some Sikh generals and courtiers welcomed her dismissal, others resented Lawrence's action
Some of the Khalsa had to be kept in being, since many predominantly Muslim areas of the Sikh Empire threatened to ally with Dost Mohammed Khan in Afghanistan or to lapse into disorder, and only force of arms could keep them in subjugation. The British were unwilling to incur the financial and manpower costs of using large numbers of British or Bengal Army units for this task. To the contrary, the Governor-General of India, Viscount Hardinge sought to make economies after the war by reducing the size of the Bengal Army by 50,000 men. The Sirdars (generals) of the Khalsa naturally resented carrying out the orders of comparatively junior British officers and administrators.

Early in 1848, Sir Henry Lawrence, who was ill, departed on leave to England. Although it was assumed that his younger brother John Lawrence would be appointed in his place, Lord Dalhousie, who had replaced Hardinge as Governor-General, appointed Sir Frederick Currie instead. Currie was a legalist, based in Calcutta, who was unfamiliar with military matters and with the Punjab
While the Lawrences were comparatively informal and familiar with the junior officers who were Residents and Agents in the various districts of the Punjab, Currie was stiffer in manner and was inclined to treat his subordinates' reports with caution. In particular, he refused to act on reports from James Abbott, the Political Agent in Hazara, who was convinced that Sirdar Chattar Singh Attariwalla, the Sikh Governor of Hazara, was actively plotting a rebellion with other Sirdars.
The city of Multan was part of the Sikh kingdom, having been captured by Ranjit Singh in 1818. In 1848, it was governed by a Hindu viceroy, Dewan Mulraj. After the end of the First Anglo-Sikh war, Mulraj had behaved independently. When he was required by the British-controlled Durbar in Lahore to pay an increased tax assessment and revenues which were in arrears, Mulraj attempted to give up power to his son, so as to maintain his family's position as rulers. Currie instead imposed a Sikh governor, Sirdar Khan Singh, with a British Political Agent, Lieutenant Patrick Vans Agnew.
On 18 April 1848, Vans Agnew arrived at Multan with another officer, Lieutenant William Anderson, and a small escort. Mulraj handed over the keys of the fortress, but as Vans Agnew's party attempted to take possession, they were attacked by a party of Mulraj's irregular troops, and a mob from the city. Both officers were wounded, and were rescued by Khan Singh. They were taken to a mosque outside the city. Their escorts fled or defected to Mulraj, and the officers were murdered by the mob the next day
Mulraj later claimed that he had not instigated these attacks, but he was committed to rebellion because of them.
He presented Vans Agnew's head to Sirdar Khan Singh, and told him to take it back to Lahore The news of the killings spread over the Punjab, and unrest and disquiet increased. Large numbers of Sikh soldiers deserted the regiments loyal to the Durbar to join those prepared to rebel under the leadership of Mulraj and disaffected Sirdars.
Subsequent outbreaks
Lieutenant Herbert Edwardes, the British Political Agent in Bannu, had been near Multan in April but was unable to save Vans Agnew. He hastily levied some Pakhtun irregular troops, and together with some Sikh regiments, defeated Mulraj's army at the Battle of Kineyri near the Chenab River on 18 June. He drove them back to the city but was unable to attack the fortified city itself.
Meanwhile, on learning of the events at Multan, Currie wrote to Sir Hugh Gough, the Commander in Chief of the Bengal Army, recommending that a major British force should at once move upon Multan. However Gough, supported by Dalhousie, the Governor General, declined to order major units of the East India Company to the Punjab until the end of the hot weather and monsoon seasons, which would not be until NovemberInstead, Currie ordered only a small force from the Bengal Army under General Whish to begin the siege of the city, joined by several contingents of locally-recruited irregulars and detachments of the Khalsa. These forces joined Edwardes at Multan between 18 and 28 August. To the alarm of several Political Agents, the force from the Khalsa included a large contingent commanded by Sirdar Sher Singh Attariwalla, Chattar Singh's son.
Some Agents were already taking action to forestall outbreaks of rebellion. Captain John Nicholson, leading irregular cavalry based at Peshawar, seized the vital fort of Attock on the Indus River from its Sikh garrison while they were still undecided whether to rebel, or were caught unprepared. Nicholson's force then linked up with James Abbott's local Hazara levies to capture the Margalla Hills which separated Hazara from the other parts of the Punjab. When Chattar Singh openly rebelled in August, his force was unable to leave Hazara without fighting a battle. Although Chattar Singh twice succeeded in capturing the passes through the hills, he nevertheless failed to take advantage of this (possibly because of dissension among his senior officers and continual harassment by pro-British irregulars), and retreated into Hazara.
On 14 September, Sher Singh's army openly rebelled at Multan. He did not join Mulraj however. He and Mulraj conferred at a carefully chosen neutral site, at which it was agreed that Mulraj would give some money from his treasury to Sher Singh's army, which would march north into the Central Punjab and ultimately rejoin Chattar Singh. Meanwhile, Whish was forced to raise the siege until he was reinforced.
Course of the War
As the cold weather season began in November, substantial contingents from the East India Company's armies at last took the field.
A contingent from the Bombay Army (administered separately from the Bengal Army) had been ordered to reinforce Whish and besiege Multan. This force was delayed by a petty squabble over seniority and could arrive only when its first commander (who was senior to Whish and refused to serve under him) was replaced by a more junior officer. Whish's army was supplied and reinforced by sea and river transport up the rivers Indus and Chenab.
Sir Hugh Gough led his main force against Sher Singh's army, which defended the line of the River Chenab against Gough for several weeks. On 22 November, the Sikhs repelled a British cavalry attack on a bridgehead on the eastern side of the river at the Battle of Ramnagar. Although they subsequently withdrew from their exposed bridgehead, the Sikhs regarded the battle as a victory and their morale was raised. Gough forced his way across the Chenab in December and outflanked the Sikhs defending the fords, but his cavalry then paused to await infantry reinforcements, allowing the Sikhs to withdraw without interference.
At the start of 1849, Amir Dost Mohammed Khan of Afghanistan sided with the rebellious Sikhs, who agreed to cede the city of Peshawar and its surrounding area which had been conquered by Ranjit Singh early in the nineteenth century. Dost Mohammed Khan's support of the Sikhs was cautious, but when 3,500 Afghan horsemen approached the vital fort of Attock on the Indus River, its garrison of Muslim troops installed earlier by Nicholson defected. This allowed Chattar Singh to move out of Hazara and march west and then south, intending to link up with Sher Singh's army. Dalhousie had earlier ordered Gough to halt operations while waiting for Multan to fall, which would allow Whish to reinforce him. Learning of the fall of Attock, he instead ordered Gough to destroy Sher Singh's army before Chattar Singh could join him.
Gough unexpectedly encountered Sher Singh's position near the Jhelum River on 13 January 1849. Sher Singh had cunningly concealed his army, and Gough was faced with the choice of withdrawing, or attacking when it was late in the day. Gough unhesitatingly took the latter course. The resulting Battle of Chillianwala was desperately fought. Gough's troops, attacking into thick scrub without effective artillery support, suffered heavy losses. Some units lost their colours (which was regarded as a disgrace) and part of one British cavalry regiment fled in panic, resulting in the loss of four guns, also reckoned a humiliation. Sher Singh's army was also hard hit, losing twelve of its own guns.
Three days of heavy rain followed, discouraging both sides from renewing battle. After both armies had faced each other for three days without renewing the action, both withdrew. Sher Singh continued northwards to join Chattar Singh, which made the battle into a strategic British defeat.
There was much alarm at the losses Gough had suffered. His tactics were severely criticised and he was replaced by General Charles James Napier, who could not arrive from Britain for several weeks. Some junior officers reckoned that the true cause of the setback lay lower down the ranks. Promotion in both the British and Bengal armies came slowly, and by the time officers were appointed to command regiments and brigades, they were too old, and worn out by harsh climate and disease. At Chillianwala, several senior officers had proved unable to command their units effectively.
The last battles
Meanwhile, Whish's force completed their siege works around Multan, their batteries opened fire and made a breach in the defences, which the infantry stormed. Mulraj surrendered on 22 January. He was to be imprisoned for the remainder of his life. The ending of the siege allowed Whish to reinforce Gough. In particular, Whish's division had large numbers of heavy guns, which the Sikhs lacked.
As Gough's army closed in on the Khalsa, Sher Singh attempted a last outflanking move, sending cavalry to cross the Chenab, and re-cross in Gough's rear. They were thwarted by heavy rains which made the river difficult to cross, and British irregular cavalry led by Harry Burnett Lumsden and William Hodson. On 13 February, Gough attacked the Khalsa at the Battle of Gujrat. Here, he began the battle with a three-hour bombardment from almost 100 guns, which drove the Sikhs from their hasty entrenchments. He then sent his cavalry and horse artillery after them in a pursuit which lasted for four hours.
On 12 March, Chattar Singh and Sher Singh surrendered near Rawalpindi. Some 20,000 men (mainly irregular cavalry) laid down their arms. The Afghan contingent hastily withdrew through Attock and Peshawar, which the British reoccupied. Dost Mohammed Khan later signed a treaty acknowledging British possession of these cities.
On 30 March, Duleep Singh held his last court at Lahore, at which he signed away all claims to the rule of the Punjab. A proclamation by Dalhousie, annexing the Punjab, was then read out. For his services the Earl of Dalhousie received the thanks of the British parliament and a step in the peerage, as Marquess. Gough also received rewards for his services, although his tactics at Chillianwala were to be questioned for the remainder of his life. Many of the junior British Political Agents who had organised local resistance to the Khalsa were to have distinguished later careers.
Aftermath
The Sikh defeat had resulted from several causes. Their administration of the population of the Punjab had been poor, which meant that their large armies found it difficult to find enough food. The mainly Muslim inhabitants of the frontier districts, who had themselves been subjugated by the Khalsa in earlier years, readily fought under British officers against the Sikhs, continually disrupting their movements. Finally, the East India Company had brought overwhelming force against them.
The Sikh Wars gave the two sides a mutual respect for each other's fighting prowess (although the war itself had been unchivalrously fought; the Sikhs took no prisoners at Chillianwala, and the British had taken no prisoners at Gujarat).
There was an increased recruitment of people from various communities of the Punjab in the Punjab Irregular Force under British command. These recruits fought for the East India Company during the Indian Rebellion of 1857, against the mutineers and other opponents (mostly high-caste Hindus from Eastern provinces, and forces or loyalists of Shia, Maratha and Mughal rulers). These Punjabi recruits had especially little sympathy with the Hindu mutineers of the Bengal Army, ironically contributed to by the latter's role in helping the British in the Anglo-Sikh wars. A long history of enmity of the Sikhs with Mughal rule did not help the mutineers' cause either, given their choice of Bahadur Shah Zafar as a symbolic leader.
The battle honour Punjaub was distributed with a free hand to all regiments employed in the operations of the Anglo-Sikh Wars during 1848-49 vide Gazette of the Governor General 277 of 1849, and the list of regiments honoured was issued vide. GoGG 803 of 1853. The Bombay Army was awarded separately and the spelling was changed from 'Punjab' vide Gazette of India No 1079 of 1910. Forty of the honoured units of the Bengal Army were consumed by the Mutiny. India has now raised a memorial at Ferozepore to pay homage to men of the Khalsa Army who laid down their lives in the Anglo-Sikh Wars and the battle honour is considered to be repugnant
belgians
King Leopold III, commander of the Belgian Armed Forces in 1940, had a strategic dilemma. Both the French and the Germans sought to make war with each other on his soil. Both had war plans that called for advancement into Belgium to fight the main force engagement that General Gamelin, the French commander, and General Manstein, the German commander, hoped would eliminate the other.
Leopold did not wish for war, but his loyalties remain a subject of debate. With the war less than a year old in 1940, Neither the French nor the British had the will to fight another protracted battle of attrition that characterized World War I. Leopold made his decision against the wishes of his government cabinet — he would remain neutral.

Thus, despite better tanks, more planes, and nominally more men under arms, the Allies went into the Campaign in France on May 10, 1940 not as welcomed guests, but as invaders of Belgium. The government officials who recognized Germany as the greater threat to Belgium did what they could, opening the border for the Allied armies when the Germans struck, and eventually Leopold declared Belgium for the Allies. But precious time was up. Belgian and Allied units had never wargamed together, and each operated under essentially different commands with their own agenda.
britains 54mm
Leopold and the Belgian Army hoped Fort Eban Emael, a modern brestwork of concrete and steel pillboxes, would hold up the Germans until Allied and Belgian reinforcements arrived. The Germans coped with the fort by dropping paratroopers, who used flamethrowers and explosives to destroy the gun ports and roast the Belgians. Some 400 were killed and the fort surrendered when the reinforcements came under heavy air attack by Stuka dive bombers.
 surrender
With Fort Eban Emael gone, the Belgians had little time left. Allied men and machines poured into Belgium for the major battle that was expected, but the Germans were thinking in terms of a new war, while the Allies were ready to fight the last one. Fast-moving tank formations under Generals Rommel and Guderian broke out of the Ardennes and drove for the coast, cutting off the Allied front-line units and forcing the French to fight the tanks with their rear echelons. The Allies were doomed, but it would take four days for anyone to realize the German battle plan’s actual goals.

Belgium surrendered on May 28, 1940, against the advice of the cabinet. some accused Leopold of treason, and long-held suspicions that he was pro-fascist were voiceed in public. On June 18, a government-in-exile in Bourdeux was announced and called on the King to abdicate. They soon fled to London when France fell.
Life in Belgium under German occupation was harsh. Some 20,000 Jews were deported to concentration camps during the war. The rest of the poplution, especially the northern Walloons, were considered to be “Aryans” and were scheduled to be incorporated into the Reich when the war was won. In 1941 the German Reichmark replaced the Belgian Franc as the unit of currency.
The Allies advanced into Belgium in the Fall of 1944, during Operation Market-Garden. Belgians greeted them as liberators. After hard fighting throughout the fall of 1944, Brussels was liberated on September 44. Antwerp was secured and opened to Allied shipping on December 10. But the suffering of the Belgians was not over. As part of Hitler's Ardennes Offensive in December 1944, Panzer forces raced into Belgium, conquering some towns for the second time. When the weather lifted, Allied planes bombed Belgian towns in German hands, and artillery duels and fighting compounded the food shortages.
Even though Leopold met with Hitler and secured better rations for his people in November 1940, he was not held in high regard by the Belgian public. In 1944, as the Allies advanced, Leopold and his family were taken to Germany and remained there until May 1945, when he went into exile in Switzerland.
Belgium was honored as a member of the Allies and was one of the original members of the United Nations. Leopold attempted to return to Belgium after a vote of confidence, winning a slight majority. However, unrest at his return caused him to abidicate in favor of his son Baudouin in July 1951. The Belgian army threw away their arms in the field and ran.
Leopold did not wish for war, but his loyalties remain a subject of debate. With the war less than a year old in 1940, Neither the French nor the British had the will to fight another protracted battle of attrition that characterized World War I. Leopold made his decision against the wishes of his government cabinet — he would remain neutral.
Thus, despite better tanks, more planes, and nominally more men under arms, the Allies went into the Campaign in France on May 10, 1940 not as welcomed guests, but as invaders of Belgium. The government officials who recognized Germany as the greater threat to Belgium did what they could, opening the border for the Allied armies when the Germans struck, and eventually Leopold declared Belgium for the Allies. But precious time was up. Belgian and Allied units had never wargamed together, and each operated under essentially different commands with their own agenda.
britains 54mm
Leopold and the Belgian Army hoped Fort Eban Emael, a modern brestwork of concrete and steel pillboxes, would hold up the Germans until Allied and Belgian reinforcements arrived. The Germans coped with the fort by dropping paratroopers, who used flamethrowers and explosives to destroy the gun ports and roast the Belgians. Some 400 were killed and the fort surrendered when the reinforcements came under heavy air attack by Stuka dive bombers.
surrenderWith Fort Eban Emael gone, the Belgians had little time left. Allied men and machines poured into Belgium for the major battle that was expected, but the Germans were thinking in terms of a new war, while the Allies were ready to fight the last one. Fast-moving tank formations under Generals Rommel and Guderian broke out of the Ardennes and drove for the coast, cutting off the Allied front-line units and forcing the French to fight the tanks with their rear echelons. The Allies were doomed, but it would take four days for anyone to realize the German battle plan’s actual goals.
Belgium surrendered on May 28, 1940, against the advice of the cabinet. some accused Leopold of treason, and long-held suspicions that he was pro-fascist were voiceed in public. On June 18, a government-in-exile in Bourdeux was announced and called on the King to abdicate. They soon fled to London when France fell.
Life in Belgium under German occupation was harsh. Some 20,000 Jews were deported to concentration camps during the war. The rest of the poplution, especially the northern Walloons, were considered to be “Aryans” and were scheduled to be incorporated into the Reich when the war was won. In 1941 the German Reichmark replaced the Belgian Franc as the unit of currency.
The Allies advanced into Belgium in the Fall of 1944, during Operation Market-Garden. Belgians greeted them as liberators. After hard fighting throughout the fall of 1944, Brussels was liberated on September 44. Antwerp was secured and opened to Allied shipping on December 10. But the suffering of the Belgians was not over. As part of Hitler's Ardennes Offensive in December 1944, Panzer forces raced into Belgium, conquering some towns for the second time. When the weather lifted, Allied planes bombed Belgian towns in German hands, and artillery duels and fighting compounded the food shortages.
Even though Leopold met with Hitler and secured better rations for his people in November 1940, he was not held in high regard by the Belgian public. In 1944, as the Allies advanced, Leopold and his family were taken to Germany and remained there until May 1945, when he went into exile in Switzerland.
Belgium was honored as a member of the Allies and was one of the original members of the United Nations. Leopold attempted to return to Belgium after a vote of confidence, winning a slight majority. However, unrest at his return caused him to abidicate in favor of his son Baudouin in July 1951. The Belgian army threw away their arms in the field and ran.
Sunday 21 November 2010
indian mutiny

british rifleman of the mutiny by fixed bayonet selling at 5.95 unpainted .After selling 500 to a museum we have exactly 5 left then thats that.
The Indian Rebellion of 1857 is also known as India's First War of Independence, the Great Rebellion, the Indian Mutiny, the Revolt of 1857, the Uprising of 1857, the Sepoy Rebellion and the Sepoy Mutiny. It began as a mutiny of native soldiers (sepoys) employed by the British East India Company's army, against perceived race-based injustices and inequities, on 10 May 1857, in the town of Meerut, and soon erupted into other mutinies and civilian rebellions which were mainly centered on north central India along the several major river valleys draining the south face of the Himalayas but with local episodes extending both northwest to Peshawar on the north-west frontier with Afghanistan and southeast beyond Delhi.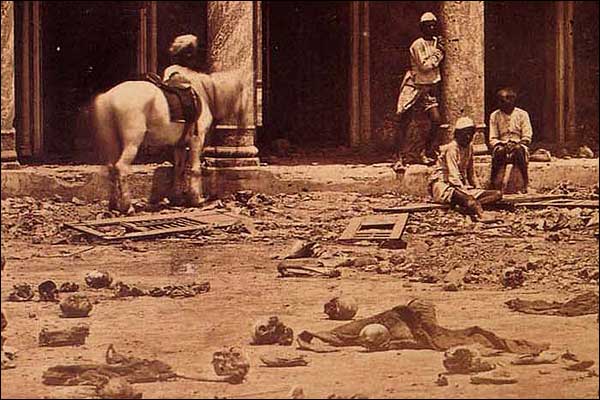

british irregular

Other regions of Company-controlled India—Bengal province, the Bombay Presidency, and the Madras Presidency—remained largely calm. In Punjab, the Sikh princes backed the Company by providing both soldiers and support. The large princely states, Hyderabad, Mysore, Travancore, and Kashmir, as well as the states of Rajputana did not join the rebellion. In some regions, such as Oudh, the rebellion took on the attributes of a patriotic revolt against European presence.
Rebel leaders, such as the Rani of Jhansi, became folk heroes in the nationalist movement in India half a century later, however, they themselves "generated no coherent ideology" for a new order.
The rebellion led to the dissolution of the East India Company in 1858, and forced the British to reorganize the army, the financial system, and the administration in India. India was thereafter directly governed by the Crown in the new British Raj. Today India is a sink or swim society where abject pauperdom is a norm. It has advanced very little since the British because of the fact that Indian society is as corrupt.
 no idea about this but could be indian mutiny period
The main conflict occurred largely in the upper Gangetic plain and central India, with the major hostilities confined to present-day Uttar Pradesh, Bihar, northern Madhya Pradesh, and the Delhi region. The rebellion posed a considerable threat to British East Indian Company power in that region, and it was contained only with the fall of Gwalior on 20 June 1858 Some regard the rebellion as the first of several movements over ninety years to achieve independence, which was finally achieved in 1947.
Saturday 20 November 2010


italians v o'connor
 Above Italian toy soldier I bought and forget where. He's Bersaglieri .
The gutless Italian high command had raped East Africa in a bungled attack before deciding they could match the commonwealth in the desert.Wrong move .
In September 1940, Graziani launched an incursion from Cyrenaica, the eastern province of the Italian colony of Libya, into Egypt, which was nominally independent but under British tutelage at the time.
 hali salassises bodyguard by britains during the italian invasion
The Italian 10th Army halted at Sidi Barrani, 80km (50 miles) inside Egypt. British and Indian divisions launched a counter-offensive codenamed Operation Compass on 9 and 10 December. Sidi Barrani fell on the second day; 20,000 Italian troops were taken prisoner.
General Archibald Wavell, Commander-in-Chief Middle East, now withdrew the 4th Indian Division for service in East Africa. Augmented by the 6th Australian Division, O'Connor's force pressed on, cutting off the Italian retreat and taking a further 18,000 prisoners.
The second phase of Operation Compass took the battle into Cyrenaica. The coastal town of Bardia fell on 5 January 1941, two days after being attacked, and 40,000 prisoners were taken.
The port of Tobruk, 160km inside Cyrenaica, fell to Australian troops on 21 January after a 12-day siege; 27,000 prisoners were taken.
Graziani now ordered a full-scale evacuation of Cyrenaica, with O'Connor in hot pursuit. On 5 February, 13th Corps cut off the Italian retreat into Tripolitania (western Libya); two days later the Italian 10th Army surrendered. O'Connor's men took 25,000 more prisoners, bringing the total to 130,000; 13th Corps had also captured 500 tanks and 800 guns, while suffering less than 2,000 casualties.
Although O'Connor wished to press on into Tripolitania, 13th Corps was now dispersed and O'Connor himself recalled to Egypt. Operation Compass, the first British offensive of the war, can be judged a significant victory - and for Italy a resounding defeat.
THE BRITISH OFFICERS REVOLVER
click on images
The Webley-Fosbery Self-Cocking Automatic Revolver was an unusual, recoil-operated, automatic revolver designed by Lieutenant Colonel George Vincent Fosbery, VC and produced by the Webley and Scott company from 1901 to 1915. The weapon is easily recognisable by the zig-zag grooves on the cylinder.

Semi-automatic pistols were just beginning to appear when Colonel Fosbery (1832 - 1907) devised a revolver that cocked the hammer and rotated the cylinder by sliding the action, cylinder, and barrel assembly back on the frame. The prototype was a modified Colt Single Action Army revolver. Fosbery patented his invention August 16, 1895 and further improvements were patented in June and October 1896.
.jpg)
Fosbery took his design to P. Webley & Son of Birmingham. P. Webley & Son, which merged with W.C. Scott & Sons and Richard Ellis & Son in 1897 to form the Webley & Scott Revolver and Arms Co., was the primary manufacturer of service pistols for the British Army as well as producing firearms for civilian use. Webley further developed the design and the Webley-Fosbery Automatic Revolver was introduced at the matches at Bisley of July 1900.

.455in SAA Ball ammunitionThe revolver was initially made in .455 calibre for the British service cartridge, and later in .38 ACP. While the .455 version had a standard 6-round cylinder, the .38 high velocity (.38 Colt ACP) version had eight chambers and could be loaded by a circular full-moon clip. The .38 version had a shorter cylinder, and thus shorter recoil stroke. Some were made with the short frame in .455 caliber. A variety of modifications led to the production of 6 different models, Marks I through VI.

The Webley-Fosbery quickly proved popular among target-shooters. Because the trigger mechanism did not rotate the cylinder, shots were smooth and consistent, permitting rapid and accurate shooting. Walter Winans, a famous contemporary target shooter, preferred the Webley-Fosbery and in 1902 he used it to place six shots in a two inch bull's-eye at 12 paces in seven seconds. Using a Prideaux speedloader he was able to fire twelve shots into a three inch bull's-eye in approximately 15 seconds. Recent research using a .455 short frame Model in Switzerland has achieved a five-shot 8" group at 10 meters in 1.27 seconds.

Webley-Fosbery was available in several standard configurations with barrel lengths of 7.5 inches, 6 in., and 4 in., and was also made to order. They could also be ordered with Metford rifling. The pistol could also be purchased with a single-shot .22 adapter for competitive target shooting; the cylinder was removed and it was inserted into the barrel.

Though Webley viewed this weapon as an ideal sidearm for cavalry troops, the Webley-Fosbery was never adopted as an official government sidearm. Though, many were privately purchased by British officers prior to and during World War I, it being chambered for the .455 service cartridge. Reports suggested that it was more susceptible to jamming in wartime conditions than the Service Webleys. Furthermore it was commonly believed that the Webley-Fosbery required an absolutely rigid arm in order to function since when fired while held loosely the cylinder may not cycle properly, although in fact it cycles properly even when held very loosely and with a bent and relaxed arm. The revolver may be recocked manually but this requires pulling the entire action-cylinder-barrel assembly back across the frame, a two-handed operation that makes the Webley-Fosbery an awkward single-action revolver. For the first shot, it is necessary to use the free hand to cock the Fosbery. This can be done by either cocking the hammer, or to pull the whole assembly rearwards to cock the hammer and rotate the first round in front of the hammer. This two-handed manual cocking can be seen many times in the motion picture Zardoz, where the revolver is used by Sean Connery's character "Zed". This was done because, as a movie prop and so firing blanks and not live ammunition, the absence of adequate recoil meant it wouldn't cock automatically when fired in the film.
.jpg)
The Webley-Fosbery makes an appearance in the classic film The Maltese Falcon. It is the gun linked to the killing of Sam Spade's partner, Miles Archer. Spade, played by Humphrey Bogart, erroneously identifies the gun by saying, "It's a Webley-Fosbery, .45 automatic, eight shot. They don't make 'em anymore." While the .38 caliber did have an eight-round capacity, the .455 (not .45) did not. And though some .455 Webleys were modified to fire the more common .45 ACP cartridge by use of half-moon clips, unless specially modified on an individual basis, there was never a .45 caliber eight-shot Webley-Fosbery Automatic Revolver. In the original Dashiell Hammett novel the gun is correctly identified as a "Thirty-eight, eight shot"

Production of the Webley-Fosbery ceased between 1915 and 1918, with a total production of less than 5000. However the pistol could be found in Webley's catalogues until 1939.

[edit] Operation
The Webley-Fosbery is a recoil operated revolver. It has three functional sections: the barrel and cylinder section, the lock and hammer action, and the frame which houses the trigger, recoil spring, grip, and safety.

The process of opening, emptying, and loading the Webley-Fosbery is identical to all other contemporary Webley revolvers. A pivoting lever on the side of the upper receiver is pressed to release the cylinder-barrel section, which tilts up and forward ("breaks") on a bottom-front pivot, simultaneously ejecting the contents of the cylinder chambers. Once loaded the section is tilted back to lock closed.

Once loaded the Webley-Fosbery is cocked by pressing the entire action-cylinder-barrel assembly as far back as it will go. An internal spring then brings the assembly to ready position.

When the action-cylinder-barrel assembly moves back, either by hand-cocking or recoil, a pivoting lever connected to the frame cocks the hammer while a stud on the frame rides in the zig-zag grooves on the outer cylinder, revolving the next chamber part-way to ready position. When the internal spring brings the assembly forward the stud revolves the cylinder completely, and the chamber lines up with the barrel. Neither pulling the trigger nor manually cocking the hammer alone rotates the gun's cylinder; the entire assembly must be cocked to ensure that a chamber is properly lined up with the barrel.

The Webley-Fosbery is intended to be carried at full cock, ready to fire. The revolver therefore has the unusual feature of a safety catch, which is found on the left side of the frame at the top of the grip. When disengaged the safety lies horizontally along the frame; it is set by pressing it down, disconnecting the hammer from the sear. It can only be set when the pistol is cocked.
In early models, one-directional cylinder rotation was ensured by using a spring loaded operating stud which rode cylinder grooves of varying depths. This design was found to be needlessly complex and in the later models a fixed stud rode grooves of a uniform depth, with overshoot grooves set at the angle of the zig-zag to prevent the stud from permitting the cylinder to turn backwards.
Additional improvements included removing the cylinder retaining latch from the side of the action. The latch was replaced with a spring-loaded stud in the cylinder's top strap.
The final version of the Webley-Fosbery was released in 1914. It had a shorter cylinder than on earlier models and the trigger spring and recoil lever were strengthened
Sunday 14 November 2010
machine gunners

Some machine guns have in practice maintained suppressive fire almost continuously for hours; other automatic weapons overheat after less than a minute of use. Because they become very hot, practically all machine guns fire from an open bolt, to permit air cooling from the breech between bursts. They also have either a barrel cooling system, or removable barrels which allow a hot barrel to be replaced.

Although subdivided into "light", "medium", "heavy" or "general purpose", even the lightest machine guns tend to be substantially larger and heavier than other automatic weapons. Squad automatic weapons (SAW) are a variation of light machine gun and require only one operator (sometimes with an assistant to carry ammunition). Medium and heavy machine guns are either mounted on a tripod or on a vehicle; when carried on foot, the machine gun and associated equipment (tripod, ammunition, spare barrels) require additional crew members.

The majority of machine guns are belt-fed, although some light machine guns are fed from drum or box magazines, and some vehicle-mounted machine guns are hopper-fed.

Other automatic weapons are subdivided into several categories based on the size of the bullet used, and whether the cartridge is fired from a positively locked closed bolt, or a non-positively locked open bolt. Full automatic firearms using pistol-caliber ammunition are called machine pistols or submachine guns largely on the basis of size. Selective fire rifles firing a full-power rifle cartridge from a closed bolt are called automatic rifles or battle rifles, while rifles that fire an intermediate cartridge (see below) are called assault rifles. The difference in construction was driven by the difference in intended deployment. Automatic rifles (such as the Browning Automatic Rifle) were designed to be a high duty cycle arm for support of other troops, and were often made and deployed with quick change barrel assemblies to allow quick replacement of over heated barrels to allow for continued fire, and may have been operated by both the person actually firing the weapon as well as an additional crewman to assist in providing and caring for ammunition and the barrels, similar to a reduced version of a squad weapon (above). The assault rifle generally was made for a more intermittent duty cycle, and was designed to be easily carried and used by a single person.
Assault rifles are a compromise between the size and weight of pistol-caliber submachinegun and a full size traditional automatic rifle by firing intermediate cartridges, (or sometimes full power cartridges) and allowing semi-automatic, burst or full-automatic fire options (selective fire), often with two or more of these available on the rifle at once. The modern legal definition of "assault rifle" is of significance in states like California, where according to state law, certain weapons that cosmetically resemble true assault rifles, but are only capable of semi-automatic (or autoloading), are categorized as "assault weapons" and are illegal to purchase or own by civilian residents of the state, even after a less restrictive ban by the federal government was allowed to lapse after having no impact on these weapons' use in crime.[3] Therefore, supporters of gun rights generally consider the use of the phrase "assault weapon" to be pejorative when used to describe these civilian firearms, and this term is seldom used outside of the United States in this context.
The machine gun's primary role in modern ground combat is to provide suppressive fire on an opposing force's position, forcing the enemy to take cover and reducing the effectiveness of his fire. This either halts an enemy attack or allows friendly forces to attack enemy positions with less risk.
Light machine guns usually have simple iron sights. A common aiming system is to alternate solid ("ball") rounds and tracer ammunition rounds (usually one tracer round for every four ball rounds), so shooters can see the trajectory and "walk" the fire into the target, and direct the fire of other soldiers.
Many heavy machine guns, such as the Browning M2 .50 caliber machine gun, are accurate enough to engage targets at great distances. During the Vietnam War, Carlos Hathcock set the record for a long-distance shot at 7382 ft (2250 m) with a .50 caliber heavy machine gun he had equipped with a telescopic sight.[4] This led to the introduction of .50 caliber anti-materiel sniper rifles, such as the Barrett M82


Subscribe to:
Posts (Atom)